Saturday, November 27, 2010

Chicken (or Turkey) Pot Pie and Happy Anniversary!

Happy anniversary to me! Today marks the one year anniversary of Bull City Food. A lot has happened in one year... all sorts of recipes, the changing of seasons, and oh yea, that whole wedding thing. :) It's been a great year for Bull City Food, which is hopefully only the first of many years of cooking and writing. My first recipe was made from leftovers of a Thanksgiving feast, so it's only fitting that I do another leftover special for this anniversary edition.
This year it's all about pot pie. And since I've finally accepted my gluten intolerance, it must be a gluten free version. Although, I promise no one would know the difference if they tried this pot pie; it's that good. However, if you would prefer to make a regular pot pie, just use any biscuit or dumpling recipe you like. (I'm sure the recipe on the Bisquick box would work just fine.) Because most of us tend to have lots of turkey left over after Thanksgiving, this is a perfect way to use up leftovers. But it also works well with chicken, so feel free to use up any leftover chicken you have from baked chicken or whole roasted chicken any time of the year.

Chicken (or Turkey) Pot Pie Filling
  • 1 tbsp olive oil
  • 1 small onion, chopped
  • 2-3 carrots, peeled and sliced
  • 2 celery stalks, chopped
  • 1 garlic clove minced
  • 1/2 cup sliced mushrooms
  • 2.5-3 cups chicken stock
  • 1 pound cooked chicken or turkey, skinned and cubed (about 3 cups)
  • 3/4 cup green peas
  • 1 tsp dried thyme
  • 2 tbsp cornstarch
  • 2-3 tbsp water
  • Salt and pepper
Heat olive oil in a large pot over medium heat.
Saute onion, carrots and celery until onion is soft and translucent, about 8-10 minutes.
Add garlic and mushrooms. Season with salt and pepper. Saute another two minutes.
Pour in chicken stock and add cooked chicken or turkey, thyme and peas (it's ok if they're frozen).
Simmer until liquid is reduced, about 10 minutes.
In a small bowl or cup, mix cornstarch and water until cornstarch is dissolved. Pour into soup mixture and bring to a boil. Allow the soup to boil for a few minutes to thicken.
Season to taste with salt and pepper.
Pour soup into a greased 9 x 13 pan.
Top soup with tablespoons of biscuit dough and cook in a preheated 400˚F oven for 25-30 minutes until filling is bubbling and biscuits are browned.

Gluten Free Crust:
  • 1 3/4 cups gluten free all-purpose baking flour (I used Bob's Red Mill)
  • 1 1/2 tsp xantham gum
  • 2 tsp baking powder
  • 1/2 tsp baking soda
  • 1/2 tsp salt
  • 1 tbsp sugar
  • 1/2 tsp dried thyme
  • 1/4 cup butter (room temp)
  • 1/2 cup milk
  • 1 large egg (beaten)
  • 1/2 tsp cider vinegar
Combine dry ingredients, flour through thyme, in a large bowl.
Add butter, milk, egg and vinegar and mix together thoroughly.

For a printable recipe click here
Recipe adapted from Bob's Red Mill website

Thursday, November 25, 2010

Happy Thanksgiving and How To Make Homemade Stock

Happy Thanksgiving everyone! This is one of my favorite holidays. What's better than a day devoted entirely to cooking and eating delicious food with your friends and family? My mom and I spent most of yesterday cooking and preparing for the big feast today. As with any big dinner party, we like to get most of the work done ahead of time so we can actually enjoy the company of our guests. We will start the day with a Turkey Trot in my parents' neighborhood followed by an afternoon of hanging out, watching sports and getting the meal together. We usually eat around 5pm - late enough to be nice and hungry but not so late that we go into an immediate food coma afterward.
Since I'm getting ready to head over to my parents' house, I'll make this quick. I just wanted to share some tips on making homemade stock so that no one makes the tragic mistake of throwing away all of those delicious bones leftover after the turkey has been devoured. So after everyone has eaten - and before the calming effects of tryptophan have taken over your body - take all of the meat off of the bones and keep it to be used later for turkey soup or pot pie (more on that to come). Then store the bones separately to be used tomorrow morning for homemade stock. A clean trash bag works really well for this if you don't have any giant, turkey-sized Tupperware on hand. After you have those nice turkey bones all ready to go, all you need is a few simple ingredients to make a delicious homemade stock. Use it all for leftover turkey soup or freeze it for later use this winter.

Homemade Stock
  • Bones of a turkey or chicken, meat, skin and fat removed
  • 1 large onion, peeled and chopped
  • 3-4 celery stocks, chopped, leaves removed
  • 3-4 carrots, chopped
  • 1 bay leaf
  • 8-10 parsley stems, leaves removed (save the leaves for another use)
  • 1 tsp whole black peppercorns
  • 1 tsp dried thyme
  • Water
In a large stock pot, combine bones, vegetables and herbs.
Pour in enough cold water to fully cover everything.
Bring stock to a boil and then reduce heat to low.
Simmer slowly for 4-5 hours, skimming the fat and foam off of the top every once in awhile.
The stock should be a golden color and taste like turkey/chicken.
Strain the liquid out and let it cool before storing in airtight containers in the refrigerator or freezer. This stock won't be salted like most store-bought stocks, so adjust future recipes accordingly.

For a printable recipe click here

Wednesday, November 24, 2010

A Weekend Getaway in Charleston

This past weekend Gavin and I went to Charleston to celebrate my birthday. Not only was it a great chance to get away just the two of us before the craziness of the holidays but it was an absolutely fantastic culinary experience. I did a lot of research before we left to pick the restaurants we would go to so that we got the most out of our time there. You could easily spend an entire month in Charleston and eat at a different amazing restaurant every night. Unfortunately, we only had two nights so I wanted to choose wisely. I asked the masses on Twitter, read reviews on Urban Spoon, and was fortunate enough to have Bon Appetit's Charleston review from the November issue. The two restaurants I decided on were Charleston Grill and McCrady's. Although I can't compare them to all of the other great restaurants in Charleston, these two definitely did not disappoint.

Tuna Sashimi at Charleston Grill
Our dinner at Charleston Grill started late, around 9pm or so, when we arrived after driving from Durham. We got a great table near the piano where Jazz musicians entertained throughout our meal. Dinner started off with a complimentary appetizer of sashimi tuna with the most perfectly cut assortment of beets, cucumbers and olives. (It was either complimentary because it was my birthday or because the sommelier really liked us; either way we were quite pleased.) Each flavor complimented the others to create an amazing dish but I'm serious when I say that they were cut perfectly. Having been graded on my knife skills, I really appreciate some good knife work. Gavin then enjoyed a Thai beef salad and found the first white wine he actually really loved - a dry German Riesling. I had a salad that combined the spicy, somewhat bitter tastes of arugula, radicchio and frisee with sweet marinated grapes, pomegranate seeds and Marcona almonds. I was almost disappointed I had gone with something as basic as a salad but this dish was anything but basic. I was pleasantly surprised at how wonderfully everything went together.

Butter Poached Maine Lobster at Charleston Grill
For our entrees, Gavin enjoyed a butter poached lobster and I had a delicious scallop dish with a black bean sauce. The kitchen staff was even kind enough to adjust the sauce a bit to make sure that it was gluten free. And not only that, but the waitress brought out some fresh-from-the-oven gluten free bread to start the meal as soon as I told her I was allergic. The gluten free bread was delicious and Gavin decided to eat most of that instead of the usual bread offering. I was amazed overall at how gluten-free friendly I found Charleston. Definitely a bonus for anyone suffering from a gluten allergy.

Beef Tenderloin at McCrady's
After a full day of shopping around King St. and admiring the beautiful Louis Vuitton bags that we would never actually purchase, we got all dressed up and took a bike taxi over to McCrady's. Bike taxis are these great little carts pulled by guys riding bikes. We felt like we did a good deed to the environment and enjoyed a nice chat with our bike "driver" (peddler? not sure what you'd call him). McCrady's has a ton of history - it's told that George Washington himself dined there - and boasts a James Beard award winning chef (Chef Sean Brock, James Beard 2010 Best Chef Southeast). The atmosphere was definitely more serene than Charleston Grill without the lively Jazz band but we did sit near a very cozy fireplace. Both of our meals were absolutely delicious but they had a hard time living up to our first incredible experience dining in Charleston.
Cocktails at The Gin Joint
Because we ate on the earlier side on Saturday, we decided to hold off on extra drinks at the restaurant and instead, go to a few bars in the area. We enjoyed our first cocktail on a rooftop bar with a perfect view of a beautiful full moon. The next stop was The Gin Joint, a recommendation from one of Gavin's coworkers. What a great suggestion! This tiny little bar serves only authentic pre-prohibition drinks in the appropriate vessels. Staying true to this time period means absolutely no vodka on the menu, since vodka wasn't popular until prohibition. The drink menu however, is extensive, including several wines by the glass and a whole variety of cocktails made from all types of whiskey, gin, and tequila.

Julep No 1: A mint julep in the classic pewter glass (The Gin Joint)
The highlight of our time at The Gin Joint, however, was meeting and chatting with the couple at the table next to ours. We just so happened to sit next to Tamara Reynolds of the blog The Sunday Night Dinner and author of the cookbook Forking Fantastic: Put the Party Back in Dinner Party. A cook and food blogger living in New York, Tamara is also a part of Unique Eats, a show on the Cooking Channel featuring, well, unique things to eat in different parts of the country. She was at The Gin Joint to taste the different items that will be featured on an upcoming episode about Charleston. How cool is that! And not only is Tamara a food blogger/cookbook author/TV personality, but she's really nice and incredibly fun to chat with. From reading her blog, you'll find that she would probably be a hell of a lot of fun to cook with too!

All in all, Charleston makes for an awesome getaway - whether you're celebrating something or not. It's an easy 4 1/2 hour drive from Durham and full of great things to do for a weekend. In addition to our amazing eating experiences, we also checked out the farmers' market on Saturday and took a harbor tour on Sunday. We will definitely be heading back, hopefully sometime soon, to check out some of the places we didn't get a chance to visit.

*My apologies for the dark photos. Low light is great for ambiance in a restaurant, not so good for taking pictures.

Charleston Grill on Urbanspoon

The Gin Joint on Urbanspoon

Friday, November 19, 2010

Butternut Squash, Arugula and Goat Cheese Quinoa

Last week I had the most amazing salad at Watt's Grocery. It was followed by a great entree and Billy Elliot at DPAC (Durham Performing Arts Center), all worthy of note and praise and all that. But instead, I want to focus on that absolutely delicious salad. Roasted butternut squash, spiced pecans and goat cheese all tossed with mixed greens and balsamic vinaigrette. Sweet and spicy and tangy all at once, it was a perfect mix of fall flavors. Both my mom and I loved this salad so I'm pretty sure it will be making an appearance at our Thanksgiving table as a new addition this year. It just goes to show how simple but great ingredients can combine to make something wonderful.
Because I couldn't get this delicious salad out of my head, I decided to recreate some of its flavors but in a new way for a meal. Rather than mixing the ingredients on top of salad greens, I decided to use quinoa (clearly one of my favorite grains) as the base and then toss in arugula to wilt with the heat of the cooked quinoa and squash. The wilted arugula acts as the "salad" part of the meal and adds a slightly peppery taste to the sweet butternut squash and the tangy goat cheese. The balsamic vinegar pulls everything together like a salad dressing would. I didn't happen to have any nuts on hand, but some toasted walnuts or pecans would be great on top. Serve as a meal or alongside of a piece of chicken or fish for a healthy, easy dinner.

Butternut Squash, Arugula and Goat Cheese Quinoa (serves 2 for dinner or 4 sides)
  • 2 tbsp olive oil, divided
  • 1 butternut squash, peeled and cut into 1/2 inch cubes (about 3 cups chopped)
  • 1 cup quinoa
  • 2 cups water or chicken stock
  • 4-5 cups arugula (about 4 big handfuls)
  • 2 tbsp balsamic vinegar
  • 2 oz goat cheese
  • Salt and pepper
  • 1/2 cup walnuts or pecans, toasted (optional for garnish)
Preheat oven to 450˚F.
Spray a cookie sheet with nonstick spray.
Toss butternut squash with about 1 tbsp olive oil (possibly less, just enough to coat) and season with salt and pepper. Spread in one layer on cookie sheet.
Roast butternut squash for 20-25 minutes, until fork tender.
While squash is roasting, combine quinoa and water or stock in a saucepan. If using water, season with 1/2 tsp salt. Bring to a boil, lower heat, cover and simmer for 10-15 minutes, until liquid is absorbed.
In a large bowl, combine cooked quinoa, butternut squash, arugula, 1 tbsp olive oil, balsamic vinegar and crumbled goat cheese. Season with a pinch more salt and pepper. Toss well to mix everything and wilt arugula.
Serve immediately, garnished with toasted nuts, if desired.

For a printable recipe click here


Butternut Squash, Arugula and Goat Cheese Quinoa

Monday, November 15, 2010

Black Bean Chili with Butternut Squash and Swiss Chard

Some days you just don't have the time or energy to, say, roast a whole chicken. I definitely have lots of nights where I'm tired or simply not in the mood to cook an elaborate dinner. For this type of night, it's best to have some go to meals that you know will be satisfying and delicious, but easy to make at the same time. For me, nothing beats soups, stews and chili when I want big results with little effort. The key with these types of meals is to change them up a bit each time. If you always make the same type of soup or same beef and bean chili, they'll start to lose some of their comfort value and just become boring instead. I've made tons of different kinds of chili - some with meat, some without - but all have that thick, hot taste of satisfaction in every bite.
This chili recipe was inspired by one I saw on Epicurious and is full of healthy beans and vegetables and perfectly fits the bill for a satisfying chili dish. It even includes one of my favorite winter squashes: the butternut squash. It adds a great layer of sweetness next to the meatiness of the black beans and the warmth of the chili powder. And best of all, this chili has everything you need for a meal in one pot. You could serve it with some rice or bread if you like, or dish it up as is in big steamy bowl fulls.

Black Bean Chili with Butternut Squash and Swiss Chard
  • 1 tbsp olive oil
  • 1 onion, chopped (about 1 cup)
  • 2 garlic cloves, minced
  • 1 butternut squash, peeled and cut into 1/2 inch cubes (about 2 cups total)
  • 2 tbsp chili powder
  • 2 tsp cumin
  • 2 x 15 oz cans black beans, drained and rinsed
  • 2.5 cups low-sodium chicken or vegetable stock
  • 1 x 14.5 oz can diced tomatoes
  • 1 small bunch Swiss chard, stems removed and leaves chopped
  • Salt and pepper
  • Grated cheddar cheese, chopped onion, for garnish (if desired)
Heat oil in a large pot over medium heat.
Saute onions until tender, about 5-8 minutes.
Add garlic, season with a pinch of salt and pepper, and cook for another minute.
Stir in butternut squash, chili powder and cumin. Saute for a few minutes.
Add beans, stock and tomatoes (with juices); bring to a boil.
Reduce heat and simmer, uncovered, until squash is tender, 15-20 minutes.
Add in Swish chard in batches. It might seem like way too many greens for the amount of chili but it will wilt down. Stir in each batch until wilted and tender, about 5 minutes total.
Season to taste with salt and pepper.
Serve chili with a scoop of rice or toasted bread and top with cheddar cheese or chopped onion, if desired.

For a printable recipe click here

Sunday, November 14, 2010

Whole Roast Chicken: Delicious any time of year

Yes, I do realize that it's not quite Thanksgiving yet. I know that it is right around the corner and I'm so excited to get together with family and friends and celebrate with delicious food. Doesn't get much better than that in my opinion. But no, I wasn't trying to make Thanksgiving come any faster. I already feel like fall is flying by way too fast, so I'm not trying to rush anything. I just got a craving for juicy, delicious roast chicken. By cooking the whole bird, you end up with a much juicier, more flavorful piece of chicken than when you cook the breast by itself. Sure it takes a little longer, but it's definitely worth it every once in awhile for a special treat. And you don't need to wait till Thanksgiving.
 Chickens are usually much smaller than turkeys so they don't take all day to cook like some of the birds we've gotten for past holidays. You can even go really mini with a Cornish game hen that can be prepared in the same way, in a lot less time, and are equally delicious. By roasting a whole chicken - the one I used was about 6.5 pounds - you not only get a delicious dinner one night, but you can use the bones to make stock and the leftover chicken for soup or pot pie. Homemade stock is really easy (I promise!) and so much better than anything you could buy in the store. I'll be sharing my stock making tips soon. I haven't decided yet whether I want to make chicken soup or pot pie, but I'll share that as well.
Anyway, getting back to that chicken. The most important ingredient to achieving a moist and juicy chicken is a meat thermometer. Do not rely on the little pop-up thing that some chickens (or turkeys) come with. By the time those things usually pop up, your bird will be dry dry dry. So buy a meat thermometer; they aren't expensive and are great for chicken, pork, steak, pretty much any meat you can cook.
Now that you have a meat thermometer, the rest is easy. Use the thermometer to check the chicken in between the thigh and breast, without touching the bone. It should read about 165˚ to 170˚F to be fully cooked. I know that most packages say 180˚, but again, this will be too dry. It keeps cooking a bit after you take it out of the oven so you want to pull it out before it gets to highest temperature before sawdust. At 165˚ it's safe to eat but still actually tastes good. The herbs stuffed inside also help, as does a good coating of salt and pepper. Serve the chicken with some gravy if you like, but it also tastes great on its own.

Whole Roast Chicken
  • 1/2 lemon, cut into quarters
  • 2-3 garlic cloves, crushed and peeled
  • 4 thyme sprigs
  • 2 rosemary stems
  • 2 tsp salt
  • 1 tsp pepper
  • 1 piece of butcher's twine, 3-4 feet long
  • 1 whole chicken (about 6 pounds)
Preheat oven to 425˚F. 
Gather all of the ingredients before dealing with the chicken so that you don't contaminate your containers and refrigerator. Combine salt and pepper in a small bowl.
Remove anything from the cavity of the chicken (sometimes the giblets will be in a bag) and rinse the chicken inside and out. Pat dry with a paper towel.
Stuff the cavity with lemon wedges, garlic, thyme and rosemary. Sprinkle a pinch of the salt and pepper mixture inside as well.
Loosen the skin away from the breast near the cavity and rub salt and pepper on the flesh, underneath the skin.
Use the remaining salt and pepper to rub the entire bird.
Truss the chicken using the butcher's twine. For a how-to video, click here. This keeps the bird neatly together so that everything cooks evenly. (You can still cook a tasty chicken without trussing if you want to skip this step.)
Place the chicken in a large pan and into the oven. Cook for about 15-20 minutes to let the skin brown.
Turn the oven temperature down to 375˚F and cook until the thermometer reads about 165˚ and the juices run clear. This will be about 1 hour 15 minutes to 1.5 hours for a 6 pound bird.
Remove the chicken and allow it to rest for about 10 minutes before cutting.
Cut the string and remove the herbs from the cavity. These are a great addition to gravy if you plan to make gravy too.
To cut the chicken, start with the legs and cut the skin connecting the leg and thigh to the breast. Gently pull the leg and thigh away from breast until the thigh bone snaps out of joint. Then cut away the meat to separate the thigh from the rest of the bird.
For the breasts, find the keel bone running along the center of the bird. Cut the breast away just next to the keel bone and down along the ribs.
For a more in-depth view of carving a bird, check out Alton Brown's video here.
Enjoy your juicy chicken and be sure to save the rest of the meat and all of the bones.

For a printable recipe click here

Wednesday, November 10, 2010

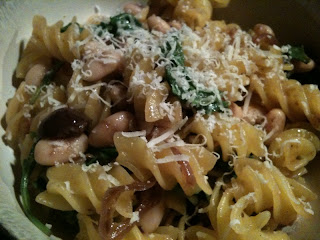
White Bean, Arugula and Olive Pasta

Monday was the last (I hope!) day of my full blown cold. It has now subsided to a mild case of the sniffles and will hopefully go away altogether soon. I sort of knew on Monday that I either needed to really take it easy and get better or I risked staying sick for much longer. So instead of my usual first day of the week business, I stayed home and did nothing. I didn't leave my apartment once - no errands, no gym, nothing. I absolutely needed this day to rest and recover as now I'm feeling much better. But despite my desire and need to stay on the couch all day, dinner time came around and we still needed to eat. Gavin was nice enough to offer to get take out but I really wasn't in the mood for a huge dinner of Thai food. So I decided to search through my fridge and pantry to see what I could come up with.

The resulting pasta dish used up what I had in the kitchen and actually tasted really good. Although this might not be a typical pasta dish, it combines ingredients that work great together in other dishes and uses flavors that compliment each other well. The dish was sweet, salty and peppery all at the same time. The olives mellow out when cooked and add a saltiness without overwhelming the dish. And the balsamic vinegar lends a sweetness that acts as a great counterpoint. If you don't like olives, as I know a lot of people who don't, you could easily leave them out and just go with the white beans and arugula. The beans add a hearty dose of fiber and protein while the wilted arugula gives a great peppery taste and acts as a salad all in the same dish. The only thing that really needs any cooking time is the shallot so the whole sauce is done in less time than it takes for a pot of water to boil and cook the pasta. Pasta dishes are a great way to use up leftovers so anytime you're looking for a quick meal, think about ingredients that go together in other dishes - like salads or dips - and mix them together with any type of pasta. Top with some Parmesan cheese and you're good to go, even if you couldn't make it off the couch to get to the grocery store.

White Bean, Arugula and Olive Pasta (serves 2)
  • 8 oz pasta, any variety
  • 1 tbsp olive oil
  • 1 large shallot or small onion, thinly sliced
  • 1 clove garlic, minced
  • 2 tbsp balsamic vinegar, divided
  • 7-8 assorted olives, pitted and chopped
  • 1 15 oz can white beans, rinsed and drained
  • Pinch crushed red pepper flakes, optional
  • 3-4 cups loosely packed arugula
  • Salt and pepper
  • 1/4 cup Parmesan cheese, plus more for garnish
Bring a large pot of salted water to a boil. Cook pasta according to package directions. Drain and reserve 1 cup of cooking water.
Meanwhile, heat olive oil in a large pan over medium heat.
Saute onions, seasoned with a pinch of salt and pepper, until tender, about 5-8 minutes.
Add minced garlic and 1 tbsp balsamic vinegar. Cook for another minute or two.
Stir in olives, white beans and red pepper flakes; cook till warmed through.
Turn heat off and stir in arugula, remaining tablespoon vinegar and 1/4 cup pasta cooking liquid, to wilt arugula.
In a large bowl, toss cooked pasta with sauce. Season with salt and pepper, if needed, and 1/4 cup Parmesan cheese. Add a bit more cooking liquid if too dry.
Serve pasta garnished with more Parmesan if desired.

For a printable recipe click here

Tuesday, November 9, 2010

Dame's Chicken and Waffles: Review from a Guest Blogger

This weekend Gavin had brunch at the new buzzed about place downtown, Dame's Chicken and Waffles. He was so blown away by it, he felt inspired to write a review, to be featured here on Bull City Food. Considering my lack of gluten tolerance, I probably won't be eating there any time soon but have heard great things. So for anyone interested in an "Almost World Famous" chicken and waffle meal, read on:
Chicken and Waffles: As Good as Unicorn Meat
This may sound weird, but chicken and waffles are what I imagine eating Unicorn meat to be like. First off, it is something I never thought I would consume.  Second, when the plate arrived, I looked down at it and it just seemed wrong – like my brain couldn’t comprehend what it was looking at.  However, after those first few bites, I quickly realized that I was eating something magical.  Chicken and waffles are sweet, spicy, salty, meaty, soft and crunchy all at the same time.  The dish, a terribly wonderful concoction, is something not of this world.  While it is something you can’t possibly expect to eat every day, Durhamites are now lucky enough to have a great place downtown that specializes in this culinary oddity.

Dame’s “Almost World Famous” Chicken & Waffles opened this summer downtown at 317 W. Main St near Beyu Caffe.  The atmosphere has the nondescript decor of a small-town Chinese restaurant - basic with cafeteria-style seating and self-serve coffee, sweet tea and water.  With that said, the service is excellent and you don’t mind getting up to get your own refills.   The wait staff greets you when you walk-in and are friendly without being too chatty – something you tend to find with new restaurants.  I do have to say that I find it funny when restaurants that serve meat hang images of Ghandi on their walls – a devoted vegetarian.  It just seems ironic.  Perhaps the image is meant to be less about vegetarianism and more about how something as simple as good food can unite people world-wide.  Or it may be the fact that Ghandi was known as “The Great Soul” and chicken and waffles are, of course, Soul Food.  Or…it could be the fact that chicken and waffles, like Unicorn meat, are simply illogical and one would do better to not try to make sense of it and just enjoy it.

Dame’s offers 10 varieties of their main dish.  Having no idea what to order, I asked my server to recommend his favorite.  He suggested “The Carolina Cockerel” which is billed as “Dame’s personal favorite! A trio of whole chicken wings served w/ a side of “Dub’s hot sauce,” a crisp and tender blueberry waffle schmeared w/ Peach and Apricot Crème $10.25.”  As mentioned above, I really enjoyed the Carolina Cockerel.  It was a culinary first for me, but one that I am sure to enjoy again (particularly after a long night of drinking).  

Chicken and waffles was a first for me so if you've never experienced what I am only assuming rivals Unicorn meat, head to downtown Durham and visit Dame's for this magical dish.


Dame's Chicken & Waffles on Urbanspoon

Monday, November 8, 2010

Roasted Sweet Potato and Pumpkin Soup

To continue with my current obsession with pumpkin, I decided to combine it with two other favorites this time of year: sweet potatoes and soup. I've made pureed sweet potato soup before so I decided to change it up a bit by using a combination of pumpkin and sweet potato. In addition, I roasted the sweet potatoes ahead of time, which adds an additional layer of flavor that can only be achieved with the high heat of roasting. As an added bonus, the soup cooks a bit quicker since the pumpkin and sweet potatoes are both cooked through ahead of time. You could always roast sweet potatoes one night as a side dish and just throw in a couple extra to save for the soup. Or cook them in the morning and then throw everything together at night for a quick and healthy dinner. Since I had a small pumpkin on hand from the farmers' market, I used fresh pumpkin, but canned would also work. Just substitute 1 can of pureed pumpkin (unsweetened) for the two cups of cooked pumpkin. The spices used in the soup combine some traditional Indian spices with the flavors associated with fall and pumpkin pie. They work together to add a warmth to the soup without being at all spicy. Serve the soup with some toasted bread and you're good to go for a great, comforting meal.

Roasted Sweet Potato and Pumpkin Soup (serves 4)
  • 2 medium sweet potatoes, peeled and diced (about 3 cups chopped)
  • 2 cups cooked pumpkin (or 1 can pureed pumpkin)
  • 1 tbsp olive oil, divided
  • 1 small onion, chopped small
  • 1 tbsp chopped fresh ginger
  • 1/2 tsp allspice
  • 1/4 tsp coriander
  • 1/8 tsp cinnamon
  • 4 cups vegetable stock
  • Salt and pepper, to taste
To roast sweet potatoes, toss chopped potatoes with 1/2 tbsp olive oil and a pinch of salt and pepper. Cook in a preheated 425˚ oven for about 30 minutes, until fork tender. Reserve in refrigerator until ready to use.

For pumpkin, slice in half and remove all seeds and pulp. Place in a baking dish, cut side down, with 1/4 inch of water. Bake in a 350˚ oven for 45-60 minutes, until fork tender. Let cool and scoop out pumpkin flesh.

Heat remaining 1/2 tbsp olive oil in a large soup pot over medium heat.
Saute chopped onion and ginger until soft and translucent, but not brown, about 8-10 minutes. Season with about 1/2 tsp salt and 1/4 tsp pepper.
Stir in allspice, coriander and cinnamon and cook for another minute.
Add cooked sweet potato and pumpkin. Pour in enough stock to cover everything, should be about 4 cups.
Bring to a boil, turn heat to medium low and simmer long enough to heat everything through and let the flavors combine, about 10-15 minutes.
Remove from heat and puree with an immersion blender, or in batches, in a food processor.
Season with a bit more salt and pepper, if necessary, depending on how salty the stock is.  
If the soup is thicker than you'd like, stir in a bit more stock or milk/ cream.

For a printable recipe click here

Saturday, November 6, 2010

Red Wine Poached Pears

I tend to go a little overboard when I cook for guests. As much as I love cooking for just Gavin and me, I don't usually go all out when it's just the two of us. But when we have dinner guests, I want all aspects of the dinner to be great. I plan out my menu, pick some good wines, and usually start preparing in advance. I like to do as much of work ahead of time as possible so that I can actually enjoy my company instead of spending the entire time chopping, cooking and worrying that everything will come together. In general, I focus mostly on the dinner and possibly some appetizers or a really good salad. Dessert, on the other hand, usually gets left out. Sometimes I'll pick up some cookies or ask my friends to bring a dessert. I don't do a lot of baking and by the time I have to figure out a dessert, I'd rather not have to do a lot of work.
However, I recently saw a chef on the Cooking Channel (I can't remember which one), making pears poached in red wine and I knew I had to make them. I love pears, especially this time of year. Add some red wine and spices and I'm definitely sold on this dessert. So I scoured the Internet for a recipe that looked good and found a great one on Epicurious. Fortunately this dessert benefits from sitting in the fridge overnight so I could make them the day before our guests were coming and then just let them reheat while we enjoyed dinner. Served with a scoop of vanilla bean ice cream, these pears were warm and sweet and the perfect ending to a great dinner with friends.

Red Wine Poached Pears (serves 4)
  • 1 750 ml bottle dry red wine (I used Merlot)
  • 2 cups sugar
  • 2 cups water
  • 2 tsp grated orange peel
  • 1/2 cup orange juice (from 1 orange, zest before juicing)
  • 1 tsp ground cardamom
  • 1 cinnamon stick
  • 4 firm pears, peeled, stems left intact
  • 1 pint vanilla ice cream
In a large pot, combine everything but pears and ice cream.
Stir over medium heat until sugar dissolves and mixture begins to simmer.
Add pears and simmer slowly until pears are tender when pierced with a knife, but not falling apart, about 35-40 minutes. If liquid is boiling, turn heat to low.
Transfer pears to a plate and set aside.
Boil liquid until it has reduced to 3 cups, about 30 minutes.
Once pears have cooled, cut in half and scoop out cores with a melon baller or small spoon. (You could leave them whole but that makes them a little harder to eat).
If making ahead, store pears in poaching liquid in an airtight container in the refrigerator.
Heat pears and liquid over medium-low heat until warmed through.
Serve 2 halves to each person with a scoop of ice cream with extra liquid drizzled over.
Save the extra poaching liquid to serve over ice cream another night.

For a printable recipe click here

Friday, November 5, 2010

Spaghetti Squash with Tomato Spinach Sauce

I'm coming down with a cold and it seems like I'm not the only one. Hopefully it will stay at just a cold and not turn into a full blown flu, like my friend suffered this week. I hate being stopped dead in my tracks, unable to get up off the couch, feeling like I'll never be able to breathe properly again. You know the feeling. As much as I love fall, the change of seasons always gets to me. Between the recent rain and the temperature being anywhere from 80˚ to 40˚, my body isn't sure what to think so I inevitably end up with a cold. But not to worry, I used my cold as an excuse to curl up on my couch with lots of hot tea and caught up on my DVR. So it's not necessarily a bad thing to get a bit of a cold, as long as it doesn't get any worse.
One thing that always works great when you have a cold, or it's just cold outside, is hot comfort food. A big bowl of pasta with a hearty tomato sauce is always an incredibly comforting dish. I realize spaghetti squash does not replace regular pasta, but topped with tomato sauce, it's a great way to enjoy winter squash and is a lot lighter than pasta. When cooked, spaghetti squash creates thin strands, like spaghetti, and is mild enough to be served with any favorite sauce. I made a simple tomato and spinach sauce and topped the whole thing with Parmesan cheese. Warm, comforting, and super healthy, this meal is great for any cold night of the week.

Spaghetti Squash with Tomato Spinach Sauce
  • 1 medium spaghetti squash, cut in half, seeds removed
  • 1 tbsp olive oil
  • 1 shallot, diced
  • 2-3 garlic cloves, smashed and peeled
  • 5 oz baby spinach, or 1 large bag
  • 3-4 sprigs fresh thyme
  • 1 tsp dried oregano
  • 1/2 tsp dried basil
  • 1/4 tsp crushed red pepper flakes
  • 2 cans diced tomatoes
  • Salt and pepper
  • Parmesan cheese
Preheat oven to 450˚F. Place squash halves, cut side down, on a baking sheet.
Roast for 25-30 minutes, until fork tender.
Heat olive oil in a large pan over medium heat.
Add shallots and garlic cloves. Saute until fragrant, about 5 minutes.
Place spinach in a microwave safe dish and cover with plastic wrap. Microwave for 3 minutes.
Stir spinach and press out as much water as possible with a clean towel or paper towels. Set aside.
Add herbs and spices to shallots and stir to combine.
Stir in both cans of tomatoes and season with about 1/2 tsp salt and 1/4 tsp pepper.
Simmer sauce until thickened, about 10-15 minutes.
Stir in spinach and heat through. Taste and season with more salt and pepper if needed.
Allow cooked squash to cool a bit before taking a fork to pull out all of the spaghetti-like strands.
Season squash with salt and pepper, top with tomato sauce and garnish with Parmesan cheese.

For a printable recipe click here
 

Tuesday, November 2, 2010

Healthy and Easy Pumpkin Bars

Halloween is definitely not my favorite holiday. I loved dressing up as a kid and in college it was just another great reason to party. But now I can't bring myself to get that excited about dressing up and my idea of a party is good food and wine with friends. I am looking forward to the days I can dress my own kids up and share in their excitement as they go out to trick-or-treat. But until that time, there is one thing that I absolutely love about Halloween: pumpkin. And not the kind you carve up into a scary face and put on your front porch. No, I'm talking about the little ones that are used for cooking. I even get excited about the pureed form you can get in a can. Pure canned pumpkin is available year round but no one thinks about it until it's time to make another pumpkin pie for Thanksgiving. But there are so many delicious things you can make with pumpkin, both whole and canned, that it's worth getting a head start on cooking with pumpkin before you make that pumpkin pie.
Pumpkin has a natural sweetness that adds to a recipe without having to include a lot of extra sugar. These pumpkin bars only use 1/2 cup of honey but with the pumpkin they taste sweet enough to be served as a light dessert or as a sweeter snack. The pumpkin also makes these bars incredibly moist. The traditional fall/winter spices of cinnamon, nutmeg and cloves make them comforting and reminiscent of pumpkin pie but can be eaten any day of the week since they are much healthier. Serve them as dessert with some whipped cream or as a snack with a cold glass of milk. Because they are made with almond flour they are gluten free but anyone can make these with ingredients you can easily get at the store. Just take blanched almonds and grind them in a food processor until they become a soft flour. Almonds are full of healthy fats and proteins and add a great nutty taste to the bars.

Pumpkin Bars
  • 1/2 cup pumpkin puree (unsweetened canned pumpkin)
  • 1/2 cup honey
  • 2 eggs
  • 1 cup almond flour (see note above)
  • 1/4 tsp salt
  • 1/2 tsp baking soda
  • 1/2 tsp cinnamon
  • 1/4 tsp nutmeg
  • 1/4 tsp cloves
Preheat oven to 350F.
In a food processor or with a hand mixer, blend pumpkin, honey and eggs until fully combined.
Mix in almond flour and all spices until an even consistency.
Pour batter into a greased 8x8 baking dish.
Bake for 30-35 minutes, until cake is set and a toothpick comes out clean.
Let cool and cut into squares.
Eat warm or store in an airtight container.

For a printable recipe click here

Recipe adapted from Elana's Pantry

Monday, November 1, 2010

Balsamic Beets and Greens over Pesto Quinoa

There's something really nice about Sunday evenings. I know a lot of people sort of dread Sunday night since it means the weekend is coming to an end and another week is just around the corner. Right now I don't get up to go to work on Monday mornings, so that probably helps in my enjoyment of Sunday evenings. But even when I was working a 9 to 5 job, I still liked the quiet and calm of a Sunday evening. Rarely does anyone make plans since most people do have to get up for work or school. That means it's an evening reserved for just me and my hubs. It also usually begins my cooking week since I tend to take Friday and/or Saturday nights off. I need the break and look forward to going out to eat a meal that someone else came up with, prepared and cleaned up afterward. But by Sunday, I'm ready to get cooking again and look forward to a fresh week of making new things and old favorites.
This Sunday's dinner was a combination of some favorite flavors, but made in a new way. I've made roasted beets plenty of times and love to pair them with goat cheese. The sweetness of the beets goes perfectly with the tangy goat cheese. They are great over arugula in a simple salad but this week I wanted to do something different. I decided to roast the beets and saute the beet greens and then combine them with the sweet flavor of balsamic vinegar. Instead of serving the beets over arugula for a salad, I used the arugula pesto left over from our grilled cheese sandwiches stirred into quinoa. The pesto melted in the cooked quinoa and gave it a new flavor that went great with the balsamic beets. I topped the whole thing with some crumbled goat cheese to add another layer of flavor and texture. Even though the meal is vegetarian, you won't miss the meat with such hearty flavors and the quinoa is a great source of protein on its own.

Balsamic Beets and Greens over Pesto Quinoa (Serves 2)
  • 3-4 large red beets, greens included (or 5-6 small)
  • 1 cup quinoa
  • 2 cups water
  • 1 tbsp olive oil
  • 1 large shallot, thinly sliced (or 1 small onion)
  • 1 clove garlic, minced
  • 2 tbsp balsamic vinegar, divided
  • 1/2 cup arugula pesto (or your favorite pesto)
  • Salt and pepper
  • 2 oz goat cheese
Preheat oven to 425F.
Trim beets, leaving about two inches of stem; set greens aside. Wash off any dirt.
Wrap beets in tinfoil and place on a baking sheet. Roast for 45-60 minutes, until fork tender. Remove from oven and let cool before trimming ends and removing skin. Cut into 1/2 inch wedges. (Can be done ahead. Keep in a sealed container in refrigerator until ready for use.)
Remove the red stems from the beet greens and cut the leaves into 1 inch wide strips. Wash well and dry.
Bring quinoa and water, with a pinch of salt, to a boil in a medium saucepan.
Cover and simmer over low for 10-15 minutes, until liquid is absorbed.
Meanwhile, heat olive oil in a large saute pan.
Saute sliced shallots until they begin to soften, about 5 minutes. Add 1 tbsp balsamic vinegar and a pinch of salt and pepper. Continue cooking for another couple of minutes, then add garlic.
Add beet greens and toss together. Cook until greens are wilted, about 5 minutes.
Toss in roasted beets and remaining tbsp balsamic vinegar. Cook to heat through. Season with salt and pepper.
Stir pesto into cooked quinoa. Season with salt and pepper if needed.
Spoon quinoa into bowls and top with roasted beets and greens. Crumble goat cheese on top.

For a printable recipe click here


Balsamic Beets and Greens Over Pesto Quinoa